Super Simple Sentiment Analysis with Node-RED
These days keeping an eye on social media for negative views about your business and tackling them head-on is paramount to not ending up customerless and eventually moneyless. This quick guide demonstrates how somebody with very little artificial intelligence know-how can set up Node-RED on a Virtual Private Server (VPS) to alert when somebody is voicing a negative opinion about their business on Twitter.
What is Node-RED?
Node-RED is an opensource tool which allows quick and easy creation of complex workflows utilising a range of components visually within the web browser without any coding knowledge. Many components are available out of the box enabling data manipulation, integration with third-party services & APIs and interaction with popular datastores with as little effort as dragging and clicking with the mouse.
Installing Node-RED
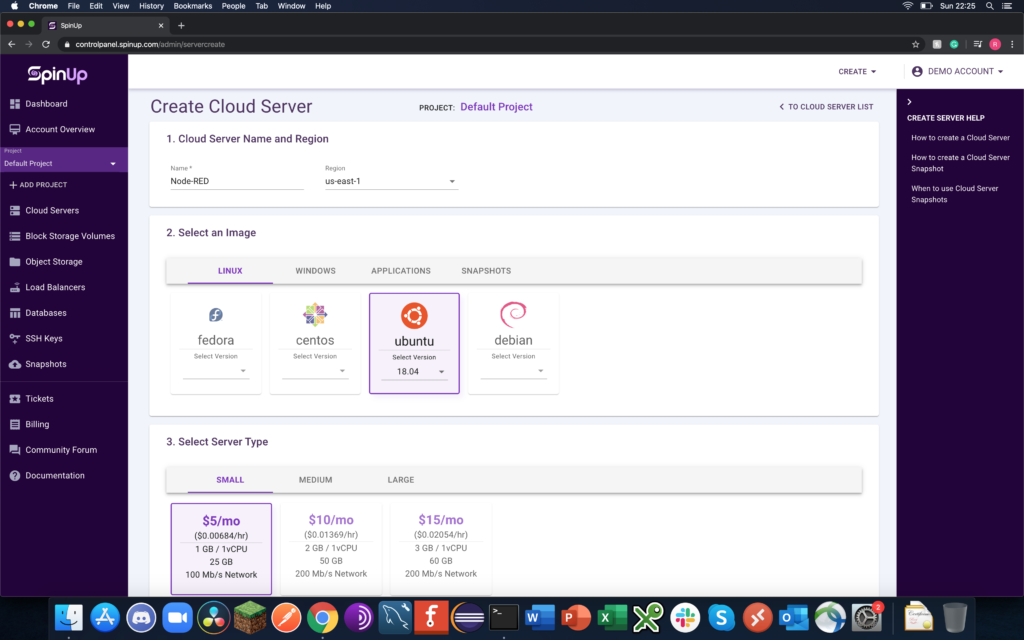
Ideally, for this use case, Node-RED should be on a host that’s up 24/7 with a reliable internet connection. This example utilises a SpinUp Cloud Server (you can get started for free with their $50 credit offer) although other VPS / Cloud providers will also work. Node-RED’s minimum requirements are very reasonable a 1GB RAM and 1 vCPU instance should be enough to get started. This guide uses Ubuntu 18.04 LTS however Node-RED does run on other Linux distributions, Windows & macOS.
Once the server is up and running login in via SSH and gain suitable privileges via sudo to install Node-RED. It is recommended that basic security hardening is performed prior to continuing the installation process to reduce the risk of your instance becoming compromised.
ssh root@<server_ip_address>After logging in Node-RED can be installed by running the following command. Please note this script only works on Ubuntu 18.04, for other distributions please refer to the manual installation instructions.
curl https://www.robertputt.co.uk/downloads/nodered/install_nodered.sh | bashOnce the script has completed the installation a message indicating the installation was successful such as below should be displayed.
Installation Complete!

You may login to your Node-RED instance by visitng https://<your_server_ip>
Username: admin
Password: <password>
Following the URL provided in the output of the script should reveal a Node-RED login screen. Authentication can be achieved using the credentials provided by the installer script.
Node-RED Basics
Once logged in to Node-RED there are a few panels to get familiar with. The left-hand panel is the palette, this contains components which you may drag and drop on to the centre panel which contains your workflow. The right-hand panel provides a debug console and allows you to edit properties of a selected node in your workflow.
Drag an “inject” node from the component palette into the workflow, nodes look a little different once in the workflow compared to when they are on the palette. The inject node has a push button on the left-hand side which activates the node, and an output connector on the right. Typically all nodes have inputs on the left-hand side and outputs on the right. Next drag a debug node from the palette and link the inject node’s output to the debug node’s input by dragging a line between the two connection markers. A debug node can be thought of a little bit like a console.log, it outputs whatever is passed to it’s input to the debug console. Once complete click the red “Deploy” button in the top right of your Node-RED page.

Try clicking the button on the input side of the inject node. Node-RED should inject the timestamp into the workflow and pass it to the debug node which prints it to the debug console on the right-hand panel if the timestamp is displayed on the console each time the button is pressed then the workflow is working properly if not then debugging should be performed until it is working satisfactorily.
Obviously this is an extremely simple “Hello World” style workflow to prove the Node-RED installation is working as expected. More complex workflows can be created by dragging various components in the palette onto the workflow and linking them as desired. The palette can also be expanded with more exotic components which can be easily installed from a repository, to perform tweet sentiment analysis the Twitter and sentiment components are required and are not installed by default, click the hamburger icon in the top right of the Node-RED page and click manage palette. Switch to the install tab and search for the term “Twitter”.
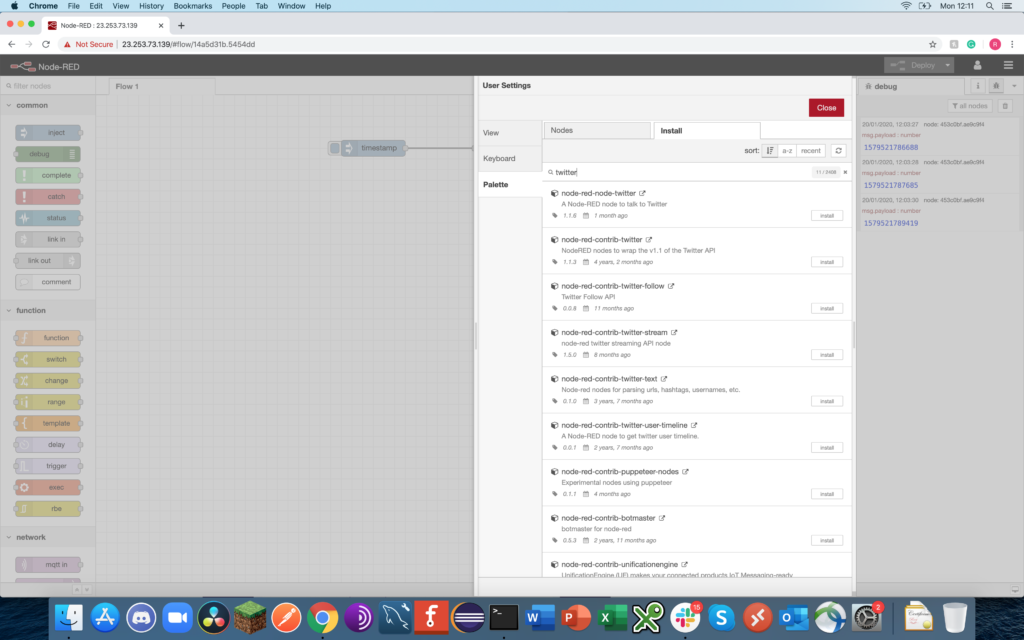
Click the install button next to the “node-red-node-twitter” component, after a brief moment the Twitter components should be installed, repeat these steps to install the “node-red-node-sentiment” component. After installation close the palette management dialog and scroll down to the bottom of the palette in the left-hand panel, the new Twitter and sentiment components should be visible.
Fetching Tweets
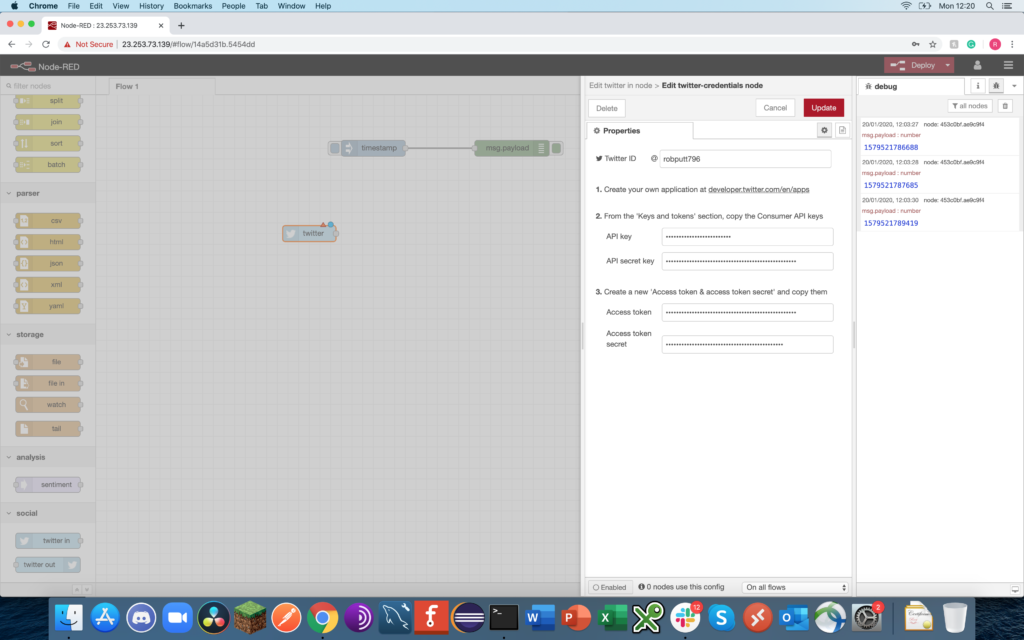
Before any analysis can be performed Tweets need to be fetched from Twitter, to link Node-RED to Twitter a set of API keys are required these may be retrieved by logging in to https://developer.twitter.com and registering a new app. Once consumer, access keys and secrets are provided drag a “Twitter In” node from the palette onto the workflow, double-clicking the node opens its properties dialog. Click the pencil icon next to the “Twitter ID” field and complete the form with the provided credentials.
In the “Twitter In” nodes “for” field enter a phrase or word to filter tweets. In this example the term “robsawesomecafe” is used as it’s unlikely anyone else will be using this term on Twitter and it allows for easy testing of the sentiment analysis later.
Next drag a connection from the “Twitter In” node’s output connector to the debug node’s input connector, click the deploy button and then send a tweet with the term that’s being filtered. If all is working well the tweet should be displayed in the debug console.
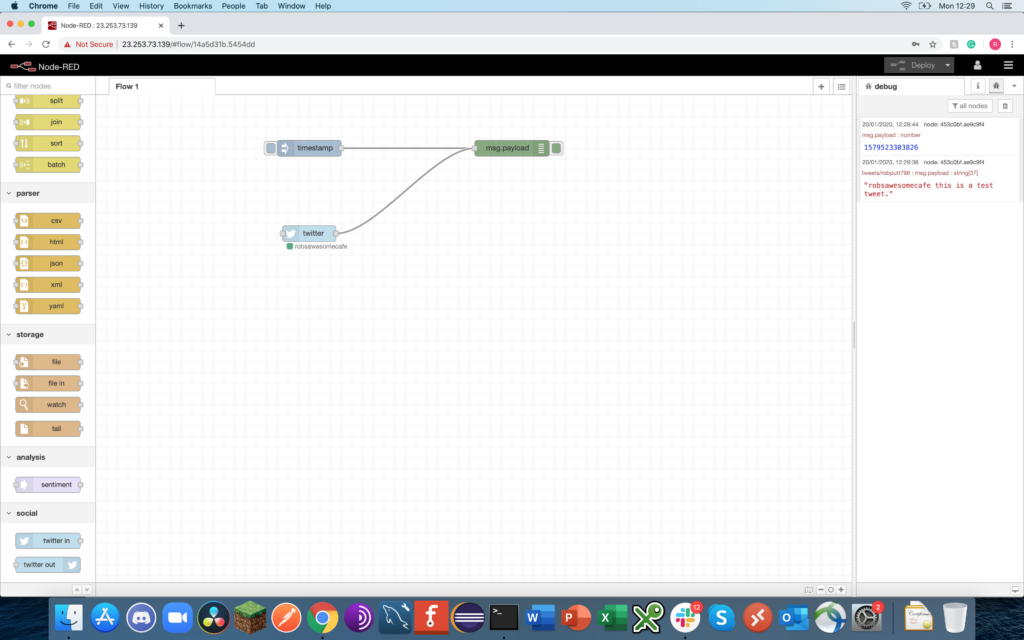
If tweets are outputted in the debug console containing the filter phrase then Node-RED is now successfully fetching messages from Twitter, if there is an error the green marker in the screenshot above under the “Twitter In” node will be red and contain information regarding the problem for example, “Incorrect Credentials” or “Rate Limited”, in this case debugging should be performed until fetching tweets is working.
Performing Sentiment Analysis
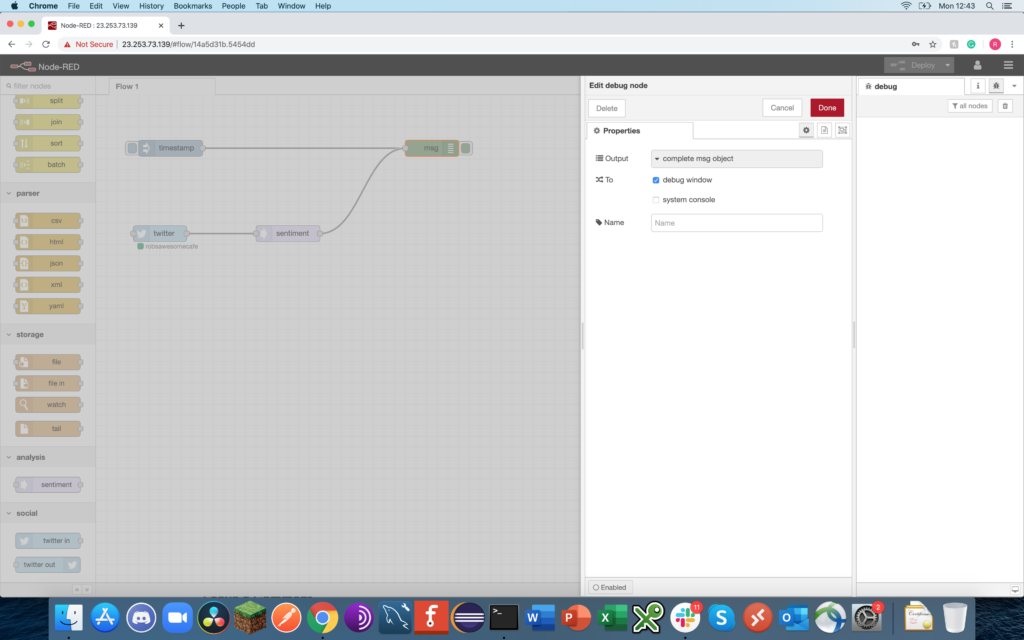
To start analysing the sentiment of tweets drag a sentiment node onto the workflow from the palette. Rearrange the workflow to pass the output of the “Twitter In” node to the debug node via the sentiment node. The sentiment node tags the message passed along the workflow with a score based on its analysis of the message’s payload, currently the debug node only outputs the message’s payload not any of its other properties, double click the debug node and from the output drop-down select “complete msg object” to output the entire message rather than just the tweet text.
Redeploy the workflow and try sending another tweet, this time ensure the tweet is either a positive or negative message. The tweet message should be displayed in the debug console and its properties can be expanded to expose its sentiment score.
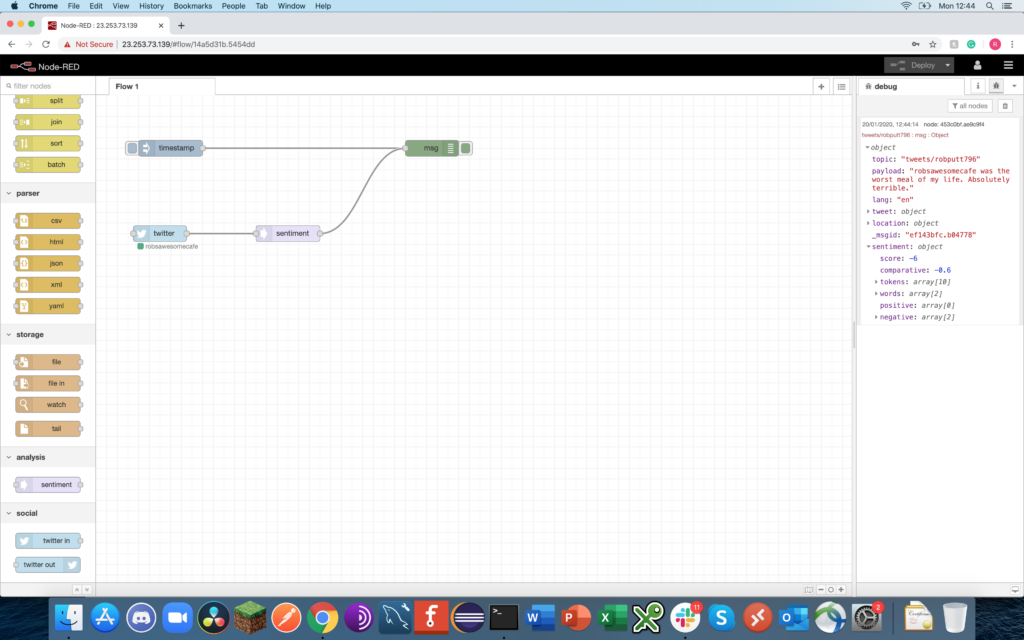
In the debug console it is visible that the payload of the tweet “robsawesomecafe was the worst meal of my life. Absolutely terrible” had negative connotations, and the sentiment analysis node has given a score or -6. The sentiment node scores message payloads from -10 to 10, with 10 being the most positive and -10 being the most negative, a score of 0 can be considered neutral.
Raise the Alarm
In this use-case, a score of -3 or worst is considered problematic and we should approach the customer to encourage them to soften or remove their tweet by offering them some vouchers or something… But this score may not match the needs of everybody, so some experimentation should be performed to identify which score should trigger an alert. Of course, it is not very practical to sit staring at the debug console all day waiting for a low scoring tweet to come in so some form of notification should be configured for negative tweets.
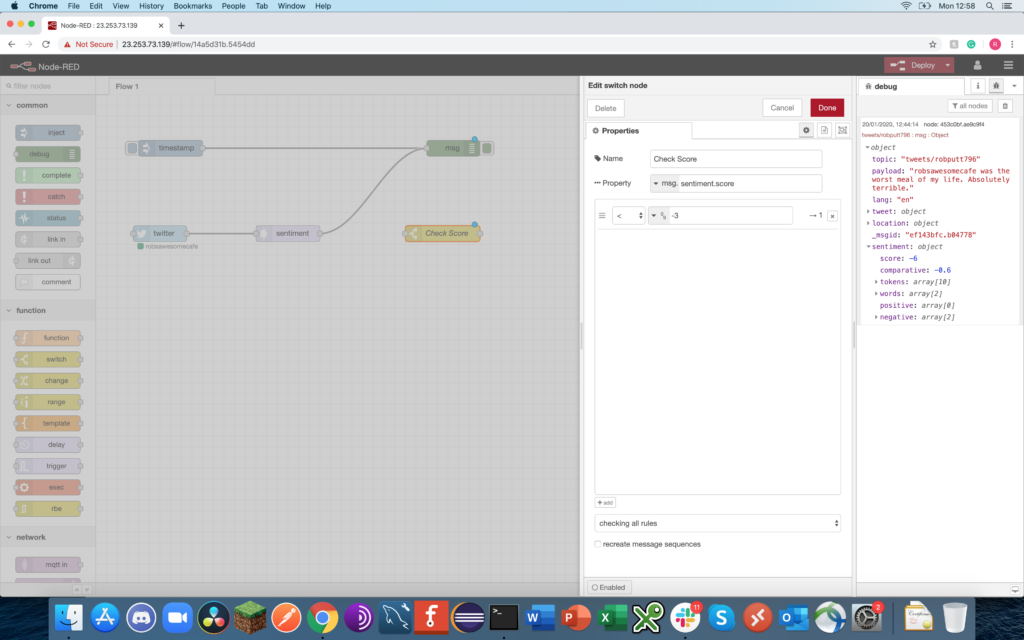
Drag a switch node from the palette on to the workflow, double click and set the property to “msg.sentiment.score” and the condition to “<= -3” as seen in the screenshot below, this will filter and only allow through negative tweets to the notification mechanism.
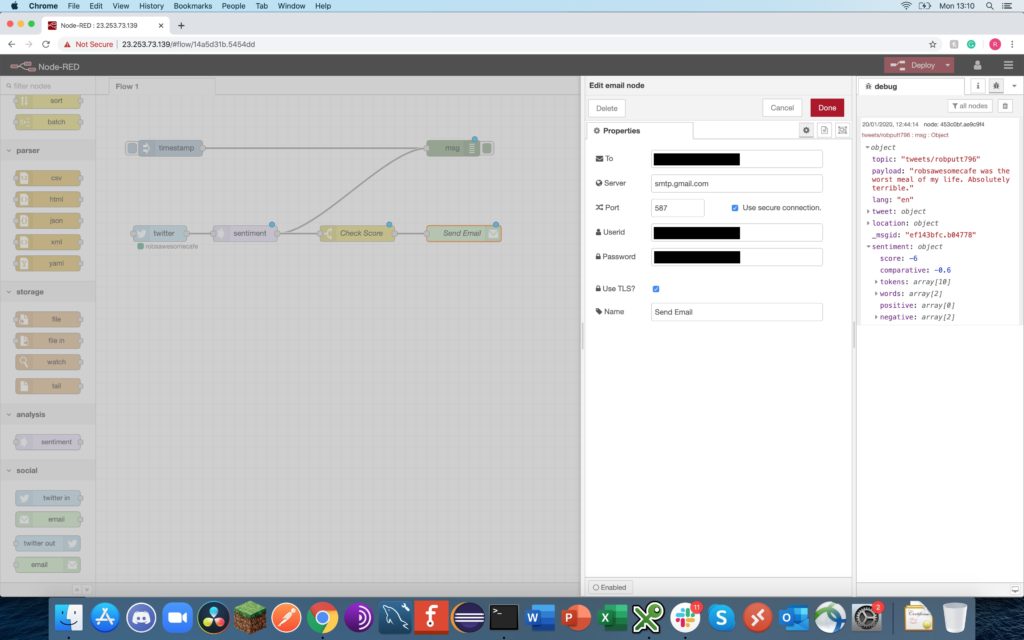
There are many different options for sending notifications including email, SMS via a third party API such as Twilio, Amazon Alexa and Google Home notifications, Pushover, and so on. These nodes are configured in a similar fashion, in this example a simple Email notification is used however, some creativity can be used here. Drag an email out node from the palette to the workflow, double click and configure with an email address and SMTP server details as provided by the email service provider. Wire up the nodes as appropriate and click the deploy button, try sending a negative tweet and check the email account to see if the notification arrived.
Providing all is well a suitably negative tweet should initiate an email and a member of staff can contact the tweeter via direct message to resolve any conflict/problems.
False Positives & Negatives
The sentiment node in Node-RED is by far not the most elaborate artificial intelligence for determining if someone is tweeting a positive or negative comment, it is rudimentary in the fact it relies on lists of words with weightings to determine the score rather than using a more complex algorithm such as those seen in machine learning so from time to time like all AI it’s likely to get the sentiment of a tweet wrong resulting in a false positive or negative score. Therefore, it’s probably good to understand it’s limitations and evaluate it’s effectiveness prior to automating anything expensive/mission-critical using such methods.
Extending the Workflow
Node-RED provides a very extensive set of components and the world is your oyster in terms of automating and building workflows which assist in day to day activities. This simple tweet sentiment analysis flow can easily be extended to offer more comprehensive automation, some things to try out include:
- Swapping out the sentiment analysis node for a more elaborate analysis option such as Neutrinos or VISEO NLP.
- Creating more thorough filters to handle different sentiments, or prioritise more negative tweets.
- Swap the “Twitter In” node for an alternative platform such as comments on a Facebook page.
- Integrate with an Internet of Things device to display positive tweets.
- Automatically reply to negative tweets via Direct Message to initiate a conversation with the complainant.
- Retweeting/replying to positive tweets to thank customers for their comments and support.
One Comment